
Hey there, Instagram enthusiasts! Remember when posting to Instagram meant fumbling with your phone, trying to get that perfect crop, and typing long captions with your thumbs? Well, those days are behind us.
In this comprehensive guide, I’ll walk you through the ins and outs of posting photos, videos, reels, and how to upload photos on Instagram using PC. Whether you’re a social media manager juggling multiple accounts or just someone who prefers the comfort of a full-sized keyboard, this blog post is for you.
How To Upload Photos On Instagram Using PC? Why Post to Instagram from Your PC?
Before we jump into the how-to’s, let’s talk about why you might want to post from your computer in the first place. Working on a larger screen gives you more control over your edits and lets you see finer details in your images. It’s also a huge time-saver if you’re creating content in bulk or need to access files stored on your computer.
If you’re managing a business account, quickly switching between your content creation tools and Instagram can streamline your workflow significantly. Not to mention, typing out those lengthy, hashtag-filled captions is much easier on a full keyboard!

Posting Photos on Instagram from Your PC
- Open your web browser and navigate to Instagram.com.
- Log into your account with your username and password.
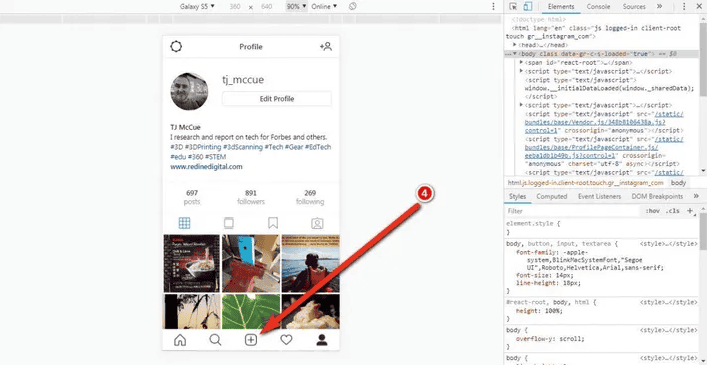
- Look for the plus icon (+) in the top right corner of your screen. This is your gateway to posting content.
- Click on the plus sign and select “Select from computer” for the photo you want to share.
- Now’s the time to get creative! Use Instagram’s built-in editing tools to adjust brightness, contrast, saturation, and more. Don’t be afraid to play around – you can always revert changes if you’re unhappy.
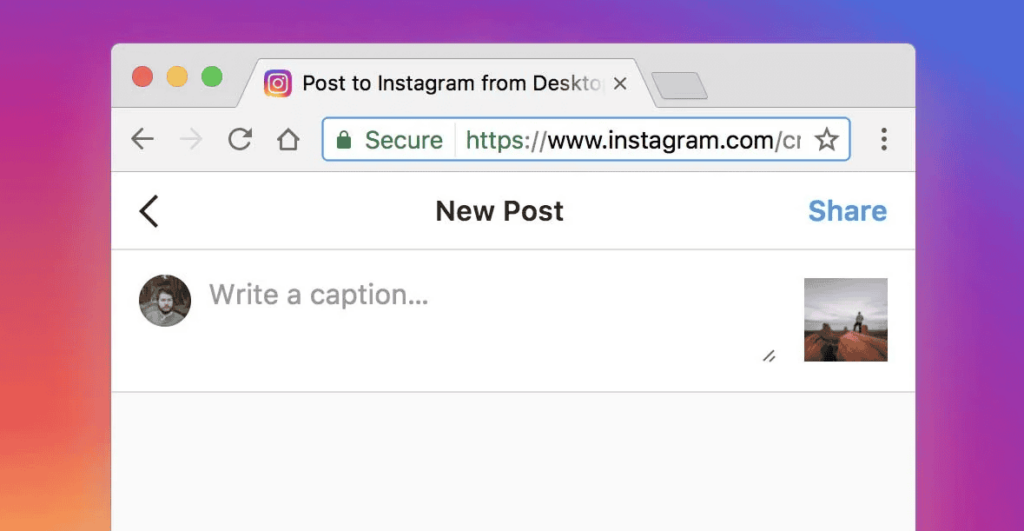
- Craft a captivating caption. Remember, your caption is just as important as your image. It’s your chance to tell the story behind your photo, engage your audience, or add those all-important hashtags for discoverability.
- Consider tagging your location. This is especially useful for businesses or if you’re sharing travel content. It helps your post show up in location-based searches.
- Use the tag people feature to credit collaborators or feature friends if applicable.
- Before you hit share, double-check your post. Ensure your image looks good, your caption reads well, and all your tags are correct.
- When you’re satisfied with everything, click that “Share” button and watch your masterpiece go live!
Pro tip: If you’re posting a carousel (multiple images), you can select up to 10 photos or videos in step 4. Use the arrows to reorder them before posting.
Sharing Videos on Instagram from Your PC
The process for uploading videos is similar to photos but with a few extra considerations:
- Follow steps 1-4 from the photo upload process.
- Once you’ve selected your video, you might need to crop it to fit Instagram’s dimensions. The platform supports various aspect ratios, but 16:9, 1:1, and 4:5 are the most common.
- Choose a cover photo for your video. This is the still image people will see before they play your video, so make it enticing!
- If your video is longer than 60 seconds (the maximum for feed videos), trim it down. Instagram provides a simple trimming tool for this.
- Consider adding captions to your video. This makes your content more accessible and can boost engagement, especially for viewers watching without sound.
- Add your caption, location, and any other details you want to include. Remember, you can use up to 30 hashtags, but using a smaller number of highly relevant tags is often more effective.
- Hit “Share” and you’re done!
Creating and Posting Reels from Your PC
Reels have taken Instagram by storm, and yes, you can create them on your PC, too:
- Start by logging into Instagram on your web browser.
- Click that trusty plus icon and select your video clip.
- Crop your video to fit the Reels format (9:16 aspect ratio) if needed.
- Choose a cover image that’ll make people want to watch your Reel. This is your chance to grab attention in the feed!
- Trim your video if it’s longer than 90 seconds (the maximum length for Reels as of 2023).
- Add your caption, relevant hashtags, and any sounds or music. Remember, trending sounds can help boost your Reel’s visibility.
- Use the ‘Align’ feature to create a multi-clip Reel. This helps create smooth transitions between clips.
- Preview your Reel to ensure everything looks and sounds right.
- Share your Reel with the world!
Uploading Stories from Your PC
While the process for posting Stories from a PC isn’t as straightforward as other post types, it’s still doable:
- Log into Instagram on your web browser.
- Look for the “Your Story” option at the top of your feed.
- Click on it and select the photo or video you want to add to your Story.
- Add any text, stickers, or drawings you want. Get creative – Stories are a great place to show personality!
- If you’re adding a video, you can trim it if needed.
- Click “Send To” and choose “Your Story” to post.
- Remember, you can add multiple photos/videos to your Story by selecting them all before clicking “Send To.”
Using Third-Party Tools for Instagram Posting
If you’re looking for even more flexibility in your Instagram posting, consider using a social media management tool like Hopper HQ or Later:
- Sign up for an account on your chosen platform.
- Connect your Instagram account(s) to the tool.
- Upload your photos or videos to the platform.
- Use their editing tools to perfect your content. Many of these tools offer more advanced editing options than Instagram itself.
- Add your captions, hashtags, and other details. Some tools even suggest popular hashtags based on your content.
- Schedule your post for the perfect time. Most of these tools offer analytics to help you determine when your audience is most active.
- Let the tool automatically post for you at the scheduled time.
These tools can be especially helpful if you’re managing multiple accounts, want to plan your content, or need more detailed analytics than Instagram provides.
Best Practices for Instagram Posting
Regardless of whether you’re posting from mobile or PC, here are some tips to maximize your Instagram impact:
- Consistency is key: Try posting regularly to keep your audience engaged.
- Quality over quantity: Posting less frequently with high-quality content than subpar content daily is better.
- Engage with your audience: Respond to comments and DMs promptly to build community.
- Use a mix of content types: Alternate between photos, videos, Reels, and Stories to keep your feed interesting.
- Leverage Instagram’s features: Use polls in Stories, go live occasionally, or create guides to fully utilize the platform.
- Track your performance: Use Instagram Insights (for business accounts) or third-party analytics tools to understand what content resonates with your audience.
Final Thoughts
Posting to Instagram from your PC opens up a world of possibilities. You can work with higher-quality images, type out longer captions more easily, and manage your content more efficiently. Whether you’re a casual user or a social media pro, mastering these techniques can seriously up your Instagram game.
Remember, while these tools and techniques are incredibly useful, the key to Instagram success isn’t just about how you post – it’s about creating content that resonates with your audience. So go ahead and experiment with these PC posting methods, but always keep your audience’s interests at heart.
Happy posting, everyone! Here’s to creating engaging, beautiful content that stops thumbs and starts conversations.